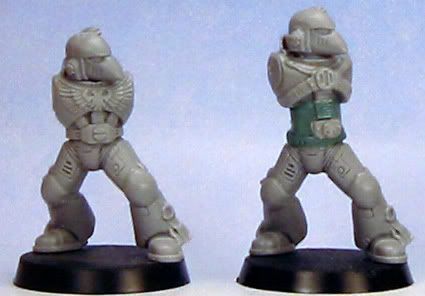
True Scale, Phase 2
Not too much of an update, but I have added some additional Green Stuff details to the GS core.
I started by adding a rim around the top of the hip joint that actually comes out over the flex ribbing at the top of the legs – to make the hip a bit wider – and I added another armor plate flap to the rear. I then let it cure for the night.
The next morning, I bulked up the core with another layer of GS that I smoothed out (so it looks more like armor, rather then wrinkled fabric ;P ). At this time, I also pushed the excess GS to the front and created the rest of the hose band cover (adding the ribbing with an exacto blade).
Finally, as the GS was curing, I shaved down the belt buckle that I had cut off earlier and pressed it into the correct location – though I may have to later glue this in place.
Once all of this cures, I will be using a little bit of plasticard to make a nice crisp belt, and then (hopefully) I will have a decent looking marine:)
I will likely add a bit of plasticard to the soles of the boots as well – which will give another mm of height or so – and the arms will have to be lengthened slightly (I think I’ll just be adding a wedge to the upper arm to lengthen it a bit).
So far I like it. It doesn’t look too disproportional, and doesn’t require excessive chopping of the miniature (just a complete GS reworking of the waist and lower torso). If I like the look, then it will be worth doing for all the marines in the chapter – though I would likely work on several at a time to speed things up (since there is a bit of curing time between each step).

3 Comments:
im gonna get off my arse and get something done tonight.
Found out that my Kitchen cabinets will be here sooner than I thought.
Also found out that I need 4 dental crowns. :o(
Also found out im in poor health, high cholesterol, high Blood Pressure, bad BMI, and Bad body fat.
On a good note, my car goes into the shop tomorrow. :o(
BMI?
Sounds more like you should leave the car at home and take your butt down to the shop;P
Sucks to hear all that - other then the Kitchen Cabinets bit:)
Well, when I go on vacation for 2 weeks, you'll get to take a break as well:D
..and what do you think of the torso expansion so far?
Post a Comment
<< Home